Making the Robot Move Autonomously
There are two periods in a match: Auton and Teleop. During the Auton period, the robot moves autonomously. During the Teleop period, the robot moves according to the user’s input.
Everything controlled during the auton period is through sequences which can be found here:
Configuring Pathplanner
We use Pathplanner to generate trapezoidal motion profiles based on beizer curves. You can download Pathplanner here.
To start pathing with Pathplanner, you need to make sure that Pathplanner knows where the root of your project is by clicking this button:

After you have done this, configure Pathplanner’s settings by going over here:

Note
Always remember to stick with meters for everything (ex. length = m, velocity = m/s, etc)
Now that Pathplanner is configured, you can start making custom paths. Here is a sample path:
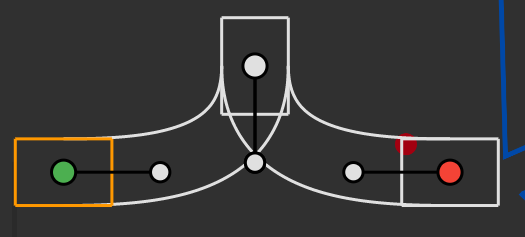
The green point represents the start, the red point represents the end, and the white point(s) represents the waypoints. When configuring waypoints, you can make precise configurations by altering these values:
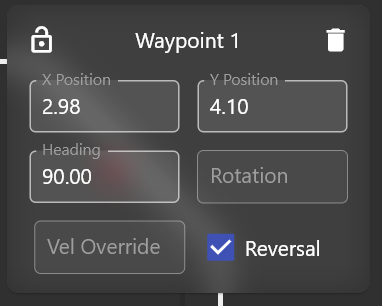
X Position - The x position of the waypoint.
Y Position - The y position of the waypoint.
Heading - The heading of the waypoint.
Vel Override - The velocity override of the waypoint (basically you can set your own desired velocity when the robot reaches that waypoint).
Reversal - Whether or not the robot should reverse when it reaches that waypoint.
Making the Chassis Follow the Path
Now, lets make the robot follow the path. For the sake of demonstration purposes, I will be using TestSequence.java to follow the path.
First, you must load the path into the sequence with this:
private static final Trajectory MY_PATH =
    PathPlanner.loadPath("PATH_NAME", AutoConstants.MAX_VEL, AutoConstants.MAX_ACCEL);
Note
Change PATH_NAME to the name of the path you want to load.
What is a trajectory?
A trajectory is basically a long list of waypoints. Waypoints describe the desired state of the robot during a path (ex. Desired velocity, acceleration, position, etc).
Following the path
Next, you need to make the chassis follow the path like this:
@Override
public void sequence() {
    addAction(new SeriesAction(Arrays.asList(
        new DrivePath(MY_PATH, true)
    )));
}
addAction - This is the method that adds the action to the sequence.
SeriesAction - This is the action allows you to string different actions together. though in this case, we only have one action, the DrivePath.
DrivePath - This is the action that actually drives the robot. The first argument is the path you want to follow. The second argument is whether or not the path is the first path. this is necessary as it determines whether or not the robot should reset its odometry.
Note
The pathing assumes that everything is global which means if your first path goes from point A to point B, your second path MUST start from point B.
Moving the Robot
After deploying the code, go to the “Main” tab in shuffleboard and select Test Sequence (or whatever you named your sequence). When you press ENABLE, the robot will follow the path.
Note
You must shout “ENABLED” loud and clear when you enable the robot.